
Proxmox, What Do I Need?
So you’ve chosen to setup Proxmox! Glad to hear it! Let’s take a look at the prerequisites and get to you up and running with your ProxmoxVE install:
- Download the Promox VE ISO from Proxmox’s website – This link will get you there: https://www.proxmox.com/en/downloads
- You’ll need an empty USB stick or DVD to “burn” the Proxmox ISO image onto. A 2GB USB stick should work well for this. Alternatively, you could burn to DVD if you’re familiar with booting that way
- Burner software of your choice – This guide will cover the USB method using Rufus on a Windows based computer to make a bootable USB drive (see note 1 on this below)
- Hardware of your choice (see note 2 on this below)
- Know how to get into your router to set a static IP or a DHCP reservation
Note 1: Burner Software
We’ll use Rufus here to make a bootable USB stick from a Windows machine. There are other option here like DVDs for physical media if you’re comfortable creating bootable media that way.
You can pick Rufus up here: https://rufus.ie/en/
Make sure you scroll down the page to the Download heading. It’ll show you the latest version and take you to Github where it’s hosted.
I’m going to assume if you’re creating bootable media from Linux or MacOS you’re using software available on those platforms (like Multiwriter on Linux or Etcher on MacOS)
Note 2: Hardware Choices
This can be any sort of bare metal machine you have available. Examples I’ve used in the past are old desktops, laptops and even a full enterprise grade server. If the machine you have available can meet this criteria, you’re in good shape (pulled out of Proxmox’s own documentation):
These minimum requirements are for evaluation purposes only and should not be used in production.
CPU: 64bit (Intel 64 or AMD64)
Intel VT/AMD-V capable CPU/motherboard for KVM full virtualization support
RAM: 1 GB RAM, plus additional RAM needed for guests
Hard drive
One network card (NIC)
Recommended System Requirements
Intel 64 or AMD64 with Intel VT/AMD-V CPU flag.
Memory: Minimum 2 GB for the OS and Proxmox VE services, plus designated memory for guests.
Fast and redundant storage, best results are achieved with SSDs.
OS storage: Use a hardware RAID with battery protected write cache (“BBU”) or non-RAID with ZFS (optional SSD for ZIL).
For PCI(e) passthrough the CPU needs to support the VT-d/AMD-d flag.
You can read more about requirements here: https://pve.proxmox.com/pve-docs/pve-admin-guide.html#_system_requirements
Got The Stuff, Let’s Make A Bootable Drive
Alright, you’ve got a machine to use, you’ve download the ISO from Proxmox, your USB stick is plugged in and you’ve got Rufus downloaded and installed. So what next?
Let’s get Rufus loaded up and ready to go
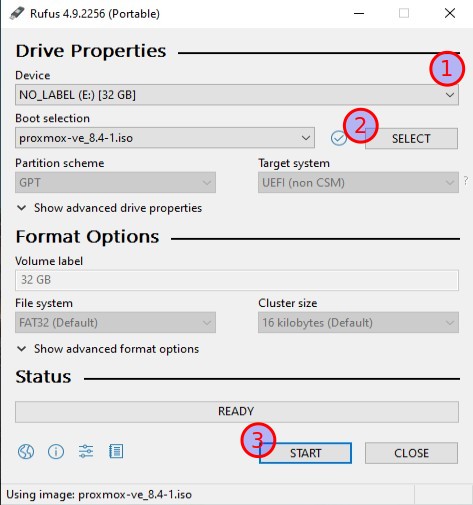
Rufus UI is pretty simple. You’ll notice different settings and boxes, so let’s break down the steps:
- 1. Select the empty USB drive in the Device drop down. CAUTION – You’ll see that this will wipe the drive out. Be sure you want to use this drive and nothing important is on there!
- 2. Click the SELECT button and browse to the location that you’ve downloaded your Proxmox ISO to.
- 3. Click start and acknowledge that you’re willing to wipe the drive and write to disk.
Note 3: You may get warnings about non specific UEFI settings and being forced to write a certain way. This should be fine. I tested this with the steps above and was able to come up with a bootable drive and load up the installer fine.
If all went well, you should now have a bootable Proxmox VE USB stick that you can now prep by moving it to your target machine.
Excellent, Where Do We Go From Here?
At this point you should be able to plug that USB stick into your target machine. One thing most PC manufacturers don’t do is put USB Bootable Media at the front of the boot order. You may need to get into the BIOS or UEFI pre-boot menu and set a temporary boot device. I won’t cover that here, but you should be able to get into those menu with the help of your motherboard/manufacturer manual or the search engine of your choice. From here we’ll move on to actual installation.
Before we get into the installation of the OS, I’d like to take you over to another post about some hardware configurations that have worked well for me over the last few years. Primarily disk setups and how to separate the OS and the VM storage. Check that out at the button below or click the other button to head on over to the installation.
Stay Geek – Northstar Geek